
You know what the best kind of iPhone video is? The kind that doesn’t looks like it was shot on an iPhone. You don’t need all sorts of fancy apps and expensive peripherals to get great mobile videos — follow these 11 simple tips for mind-burstingly gorgeous snaps.
 Now that you’re stacked with iPhone video know-how, you can plunge into more advanced techniques. Watch our Mastering Mobile Video series for insight into working with light, shot composition, audio capturing, and cool mobile gear. And to get all this video advice delivered to you hot off the digi-presses, subscribe to our weekly blog digest — just enter your e-mail on the upper right-hand side of the blog homepage. We promise to only email once a week (no spam, pinky swear!), and you’ll get notified of awesome things, like our next blog post highlighting the best mobile apps to add vavoom to your videos.
Adjust your settings
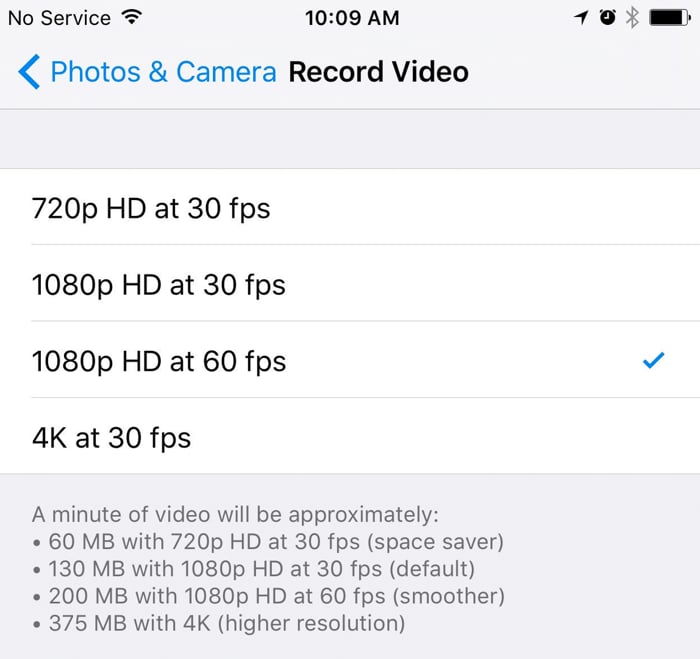
1. Get smoother, sharper video quality
Did you know you can improve your video recording quality by changing your settings to record at 60 frames per second (fps) instead of the default 30 fps? Just go to Settings > Photos & Camera > Record and toggle your active settings. For iPhone 6s, you can even choose to shoot in high-definition 1080p or even higher-def 4K. Keep in mind though that amping up your settings will make your video files bigger, since you’re capturing more frames.
Position yourself (literally) for success
2. Hold your camera horizontally
Yes, we’ve all heard the rumor that vertical video is the new black, but horizontal video will always be near and dear to our hearts. Vertical video really only makes sense if you’re shooting a short clip meant for mobile viewing (like on Snapchat), but horizontal video is a much more natural viewing experience for the average human. If you’re making anything longer than a few minutes, or if you expect viewers to watch on a TV screen or desktop monitor, do your audience a favor and shoot horizontally.3. Mobilize your manual zoom
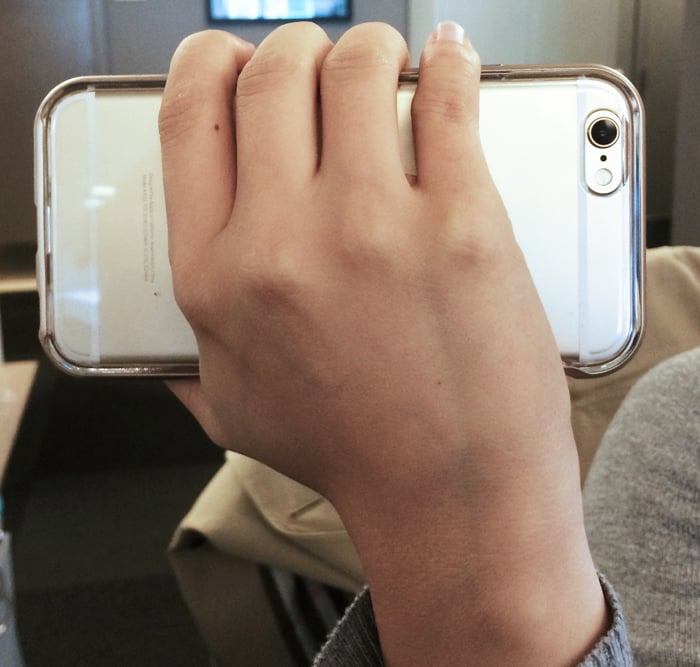
If you need to get closer to your subject, don’t use the in-camera zoom. Use your feet! If you digitally zoom, the video quality suffers. Of course, there will be times when you won’t be able to get close to your subject. We recommend taking the fully zoomed-out video on your phone and cropping to the desired close-up using video-editing software later. Since digital zoom has the same effect as cropping, you’ll have more flexibility in composing your shot using editing software than starting off with a cropped/zoomed video. Plus, you never know what you might capture in your full shot that you might would have missed by zooming in:4. Steady your shot
The best thing to do to steady your shot is to lean or prop yourself up against something. But, if no walls or other fab leaning materials are handy, make a fist around your phone with your fingers facing toward your body — this will give you super stability.
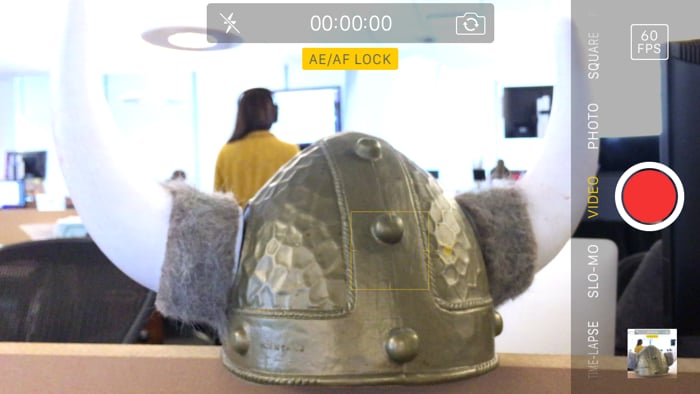
5. Be shallow
Nothing screams ‘quality’ like having a shallow depth of field in your shot! This is when the object closest to your camera is in focus and everything in the background is blurred out. On a real camera, you would adjust the aperture to change your depth of field. Unfortunately, the iPhone doesn’t have a mechanical aperture, so the depth of field can’t be manually controlled. But you can simulate the effect using the iPhone’s AE/AF lock function. Long tap (press and hold) on your camera screen while the subject you want to capture is in the foreground. This will lock the focus on that object and blur everything in the background, making your subject pop. This works particularly well for stationary subjects, like if you want to film a video interview.
Go BRIGHT or go home
6. Turn up your screen brightness
Max your screen brightness in order to see what you’re capturing in true color — that is, the colors that are actually being recorded regardless of the screen’s brightness. This will help you tell the difference between the scene being too dark to shoot or the screen being too dark to see.7. Adjust your exposure
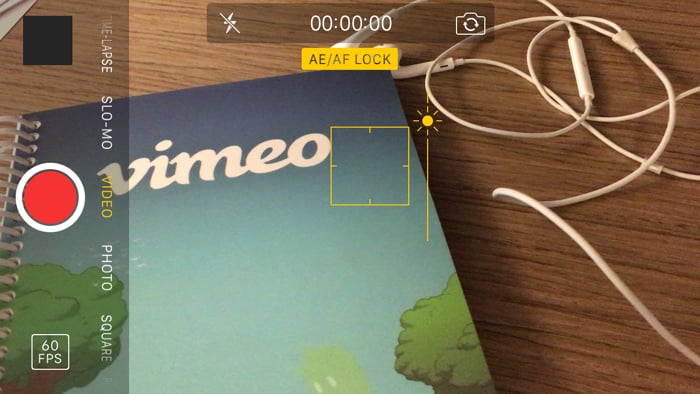
In iOS 8 and later, you can separate your iPhone camera’s exposure (how bright your video is) from its focal point. Set your focus with tip #5, then you can separately change your exposure by swiping up or down on your screen. You’ll notice a vertical slider appear on the side of your AE/AF lock box:
8. Turn on your flash
To take video in low-light situations, you can increase your exposure with the step above to brighten the scene. As an alternative, you can turn your flash on while recording to light your subject. Just hit the flash icon in the upper left corner of your screen and turn flash to ‘on.’ Spooky.Become a master manipulator
9. Speed it up or slow it down
iOS 8 and later includes time-lapse and slow-motion functionality. A good general rule of thumb is to use time-lapse when your subject is moving slowly, and slow motion when your subject is moving quickly. Time-lapse:
Slo-mo:
10. Conscientiously capture your color grade
If you want a truly cinematic look in your iPhone video, use an app with filters that color grade your video. Be careful, though — not all filters are created equal. Some filters make the quality of your video look degraded or tacky. Cameo, our free video-editing app, has eight cinematic filters created by professional color graders that will add the ‘pop’ your video needs without hurting the quality of your video.Capture more videos
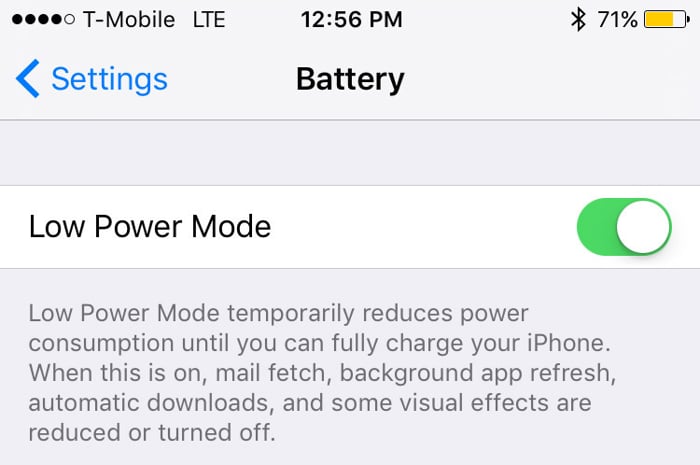
11. Use low power mode
Battery-saving hacks might not help your video quality, but they sure will allow you to take more videos from a single battery charging. Since iOS 9, there is now a ‘Low Power Mode’ for your iPhone to help you maximize the life of your single charge. If you’re planning on going on an epic video-shooting spree, it might be worthwhile to follow these extra battery saving tips as well.
Now that you’re stacked with iPhone video know-how, you can plunge into more advanced techniques. Watch our Mastering Mobile Video series for insight into working with light, shot composition, audio capturing, and cool mobile gear. And to get all this video advice delivered to you hot off the digi-presses, subscribe to our weekly blog digest — just enter your e-mail on the upper right-hand side of the blog homepage. We promise to only email once a week (no spam, pinky swear!), and you’ll get notified of awesome things, like our next blog post highlighting the best mobile apps to add vavoom to your videos.
Get more Vimeo video school wisdom
